Personalized Content and Content Management Systems

I’ve been meaning to write this post for a while. Couple of months ago, Bill Maher‘s ending monologue was about personalized content. All of us who have been working with Sitecore and other content management systems knows what this is, of course. A very big majority of the users of Sitecore are marketers, and their goal is to captivate as much of their audience as possible, part of their strategy includes tailoring the content to the reader. Sitecore offers sophisticated tools to be able to track what the user prefers and then serve up specific content that interests the reader. This is great for the reader, who gets to see more content about topics that they like.

So – Bill Maher’s premise is that personalized content is making us dumber. According to him, more and more Americans are only getting “news” from places that only reinforce what they think. This leads to unchallenged thoughts and opinions, which can hinder an expanded thinking process. You can view the entire transcript here: http://bit.ly/1hXHpzE

You can also watch the video:

I get where this is coming from. I do believe that it is necessary to get a variety of information from all different sources in order to form a solid opinion about something. But as usual, there are exceptions to rules for everything. News is supposed to be about facts. It is factual information being told back to us. This IS supposed to come from multiple sources because one party may not always have all the information. There is a certain bit of corporate responsibility that news organizations should have. Its one thing to only get news from one source, and its another thing to get news about one thing. Organizations can control the latter, but they cannot control the former.

However, I think the level of personalization comes in at a much lower level, way after one has already chosen what source they want to get their information, and so it does not affect pursuing peoples focus. And this is why it does not really matter if the content at this level is personalized. If I like landscape photography, then I do want to read about landscape photography at my favorite photography website. But the website does not have any choice about the fact that I chose THAT website to go to. Nor does it have any say about the fact that I am not reading about any other sort of art.

This specifically (I believe) does not apply to branding and product sites. The idea of these sites is to make the audience interested in their product, and they have a very specific goal in mind – conversions. The site that Bill spoke about like facebook, yahoo, etc have a much more global reach, and a much wider variety of audience. Their only goal is to have people staying on their site – a very different goal than corporate and branding websites (not to say they don’t want that, too) – in the end I think people have certain responsibility as well, to seek out information and perspectives from a variety of sources.

If you do want to personalize content, take a look at Sitecore’s Personalization Editor

An edited version of this post also appears on The Runtime Report.

Using Neo4J for Website Analytics

This is a cross-post from the digitalian

Working at the office customizing and installing different content management systems (CMS) for some of our clients, I have seen different ways of tracking users and then using the collected data to:

  1. generate analytics reports
  2. personalize content

I am not talking about simple Google Analytics data. I am referring to ways to map users into predefined personas and then modify the content of the site based on what that persona is interested into.

Recently, I grew interested in graph databases – in particular Neo4J – and since it’s quite simple to create a graph that maps the structure of a website (i.e. the website sitemap), I begun to think that there might be a way to employ the power of graph DBs to:

  1. track users more efficiently
  2. use the collected data to generate better analytics reports
  3. get better realtime content personalization
  4. be able to efficiently answers questions that would have been hard to answer using regular tracking mechanisms

This morning, while I was having breakfast, I started brainstorming possible ways to use Neo4J to track users. My first obvious ideas was to simply connect each user to all the pages they had visited:

An interesting starting point which I immediately redraw adding the concept of time tracking in each visit, by connecting visited pages in a sequence using a linked list:

Next, before going to the office, I posted these two sketches on Twitter asking for some feedback. Lots of people interested in graph databases (and Neo4J) were immediately interested.

Among them, @kennybastani suggested to “think of each visit as an event node” in order to “preserve continuity of paths“. This is my interpretation of his suggestion:

At this point we realized that the 140 characters limit imposed by Twitter would get in the way of an interesting discussion and we decided to turn this brainstorming session into a blog post to give everyone a chance to participate.

Personas

A persona is a group of visitors that visit a website, that share a common objective, purpose or background which make them distinct from another group of visitors.

Understanding in real time, as the visitor browses a site, what is the purpose of his visit, can help tailoring the content displayed in the sidebars to better appeal his/her interests.

Each page of the site can be assigned a value for each of the different personas identified as the most likely types of visitors for the site at hand. Here is my try to add this concept to the previous graph:

In order to better understand the idea behind this, let’s take a concrete example: an animal rescue shelter. Some visitors will come to the site to look to volunteer; others will want to understand how to fundraise. Others are looking to adopt either a cat or a dog. Some are coming to donate money to the shelter.

The following graph takes in account all the above personas and shows some possible values assigned to certain pages.

By the time the user gets to the Puppies:Page, he/she has already accumulated from the previous pages:

  • 12 points as a person that wants to adopt
  • 4 points as a dogs lover
  • 2 points as a possible donor

therefore in the sidebars of the Puppies:Page we should show some Calls To Action (CTAs) to donate money to the shelter using images of dog puppies. “Duh — you might say — the person is on the Dogs/Puppies page, so obviously you will show such a CTA!” That’s true… but let’s imagine that, after visiting Lucy:Page, that the visitor goes back to the homepage. By this time he/she has accumulated:

  • 26 points as a person that wants to adopt
  • 20 points as a dogs lover
  • 2 points as a possible donor

Guess what should be shown big on the homepage?

  • At the top I would show a large CTA inviting the visitor to donate, using the image of a puppy dog (because the user is a dogs lover).
  • In the sidebars, I would place a few CTAs inviting the user to adopt some of the dogs that have been at the shelter for the longest time (because the user is interested in adopting).
  • Most of the articles featured on the home page should be happy stories about dogs who were adopted and now live a happy life with their new families.

Value of using graphs

Everything I said so far can be accomplished with relational databases. The main concern there is the size of the database (tracking databases tend to become large quickly and this obviously can deter real time performance).

The question that remains on the table is whether graphs can bring value to this scenario either by:

  • providing faster feedback to the content management engine
  • allowing to do better offline reporting
  • allowing to answer questions that would be difficult to answer with a traditional relational database

Ideas? Thoughts?

Building a SPA with AngularJS and Neo4J – Data Structure (Second Try)

This is a crosspost from The Digitalian

At the end of last post I quoted the eye-opening comment that Graph Grandmaster Wes Freeman left on one of my questions on Stack Overflow. Following his advice I decided to change the way each of the queues in my application was handled, adding two extra nodes, the head and the tail.

new queue structure

Inserting a New Card

Moving the concepts of head and tail from simple relationships to nodes allows to have a single case when inserting a new card. Even in the special case of an empty queue…

new queue structure

all we have to do to add a new card to the tail of the queue is:

  • find the (previous) node connected by a [PREV_CARD] and a [NEXT_CARD] relationships to the (tail) node of the queue
  • create a (newCard) node
  • connect the (newCard) node to the (tail) node with both a [PREV_CARD] and a [NEXT_CARD] relationships
  • connect the (newCard) node to the (previous) node with both a [PREV_CARD] and a [NEXT_CARD] relationships
  • finally delete the original [PREV_CARD] and a [NEXT_CARD] relationships that connected the (previous) node to the (tail) node of the queue

new queue structure

which translates into the following cypher query:

MATCH (theList:List)-[tlt:TAIL_CARD]->(tail)-[tp:PREV_CARD]->(previous)-[pt:NEXT_CARD]->(tail)
WHERE ID(theList)={{listId}}
WITH theList, tail, tp, pt, previous
CREATE (newCard:Card { title: "Card Title", description: "" })
CREATE (tail)-[:PREV_CARD]->(newCard)-[:NEXT_CARD]->(tail)
CREATE (newCard)-[:PREV_CARD]->(previous)-[:NEXT_CARD]->(newCard)
DELETE tp,pt
RETURN newCard

Archiving a Card

Now let’s reconsider the use case in which we want to archive a card. Let’s review the architecture:

new queue structure

We have:

  • each project has a queue of lists
  • each project has an archive queue to store all archived cards
  • each list has a queue of cards

In the previous queue architecture I had 4 different scenarios, depending in whether the card to be archived was the head, the tail, or a card in between or if it was the last card left in the quee.

Now, with the introduction of the head and tail nodes, there is only one scenario, because the head and the tail node are there to stay, even in the case in which the queue is empty:

  • we need to find the (previous) and the (next) nodes, immediately before and after (theCard) node, which is the node that we want to archive
  • then, we need to connect (previous) and (next) with both a [NEXT_CARD] and a [PREV_CARD] relationship
  • then, we need to delete all the relationships that were connecting (theCard) to the (previous) and (next) nodes

The resulting cypher query can be subdivided in three distinct parts. The first part is in charge of finding (theArchive) node, given the ID of (theCard) node:

MATCH (theCard)<-[:NEXT_CARD|HEAD_CARD]-(l:List)<-[:NEXT_LIST]-(h)(theArchive:Archive)
WHERE ID(theCard)={{cardId}}

Next, we execute the logic that I described few lines earlier:

WITH theCard, theArchive
MATCH (previous)-[ptc:NEXT_CARD]->(theCard)-[tcn:NEXT_CARD]->(next)-[ntc:PREV_CARD]->(theCard)-[tcp:PREV_CARD]->(previous)
WITH theCard, theArchive, previous, next, ptc, tcn, ntc, tcp
CREATE (previous)-[:NEXT_CARD]->(next)-[:PREV_CARD]->(previous)
DELETE ptc, tcn, ntc, tcp

Finally, we insert (theCard) at the tail of the archive queue:

WITH theCard, theArchive
MATCH (theArchive)-[tat:TAIL_CARD]->(archiveTail)-[tp:PREV_CARD]->(archivePrevious)-[pt:NEXT_CARD]->(archiveTail)
WITH theCard, theArchive, archiveTail, tp, pt, archivePrevious
CREATE (archiveTail)-[:PREV_CARD]->(theCard)-[:NEXT_CARD]->(archiveTail)
CREATE (theCard)-[:PREV_CARD]->(archivePrevious)-[:NEXT_CARD]->(theCard)
DELETE tp,pt
RETURN theCard

Performance

I am very satisfied with how much simpler the new queries are, both to write and to understand, when compared to the older one discussed in the previous post of this series. At this point Wes suggested to run some performance tests. The results can be found below. Not much of a difference from a performance point of view – especially because this was an end-to-end performance test, calling N times the server, executing one insertion/archival at a time.
I ran each test three times, with the individual times in columns TIME 1, TIME 2 and TIME 3.

Using the New Architecture

TEST #1: INSERT (n) CARDS (in the same list)
# CARDS TIME 1 (ms) TIME 2 (ms) TIME 3 (ms)
10 77 56 58
100 552 534 526
1000 5133 4978 4903
10000 51342 51454 54709
TEST #2: ARCHIVE (n) CARDS (from the same list)
# CARDS TIME 1 (ms) TIME 2 (ms) TIME 3 (ms)
10 54 56 55
100 509 402 377
1000 3395 3508 2903
10000 27675 23381 22312

Using the Old Queries

TEST #3: INSERT (n) CARDS (in the same list)
# CARDS TIME 1 (ms) TIME 2 (ms) TIME 3 (ms)
10 116 118 111
100 1019 996 899
1000 7673 6262 6200
10000 62680 55663 58081
TEST #4: ARCHIVE (n) CARDS (from the same list)
# CARDS TIME 1 (ms) TIME 2 (ms) TIME 3 (ms)
10 148 133 124
100 954 784 676
1000 4958 3950 3539
10000 26921 23908 22942

Conclusions

I hope you find this post interesting as I found working through this exercise. I want to thank again Wes for his remote help (via Twitter and Stack Overflow) in this interesting (at least to me) experiment.

Building a SPA with AngularJS and Neo4J – Data Structure (First Try)

This is a crosspost from The Digitalian

Building Trello with AngularJS and Neo4J

As I mentioned in one of the previous articles of this series, the project I am working on — called Collaborative_Minds — consists of implementing the basic functionalities of Trello, a free web-based project management application made by Fog Creek Software, the legendary New York based software development company founded by Joel Spolsky, the father of Stack Overflow.

Trello uses a paradigm for managing projects known as kanban:

  • Projects are represented by a board
  • each board contains a number of lists (corresponding to task lists)
  • lists contain cards (corresponding to tasks).

Cards are supposed to progress from one list to the next, for instance mirroring the flow of a feature from idea to implementation.

Queue of queues of queues

Trello is a Single Page Application built with Backbone.js, Node.js and MongoDB — you can read here all the details about Trello’s cutting edge technology (as Joel himself describes it).

Maybe because I use Trello on a daily basis at work, I figured it would be the perfect candidate for an exercise to learn about SPAs, AngularJS, JavaScript-based programming stacks and Neo4J.

So, let’s review one more time the basic idea of Trello:

  • we have a number of Projects (represented as boards)
  • every Project has a number of Lists (whose order can matter)
  • every List contains a number of Cards (again the order could potentially matter)

I decided to implement this with a queue of queues of queues as the main data structure:

  • a main queue of Projects
  • each Project in the main queue has a queue of Lists
  • each List contains a queue of Cards

Queue of queues of queues

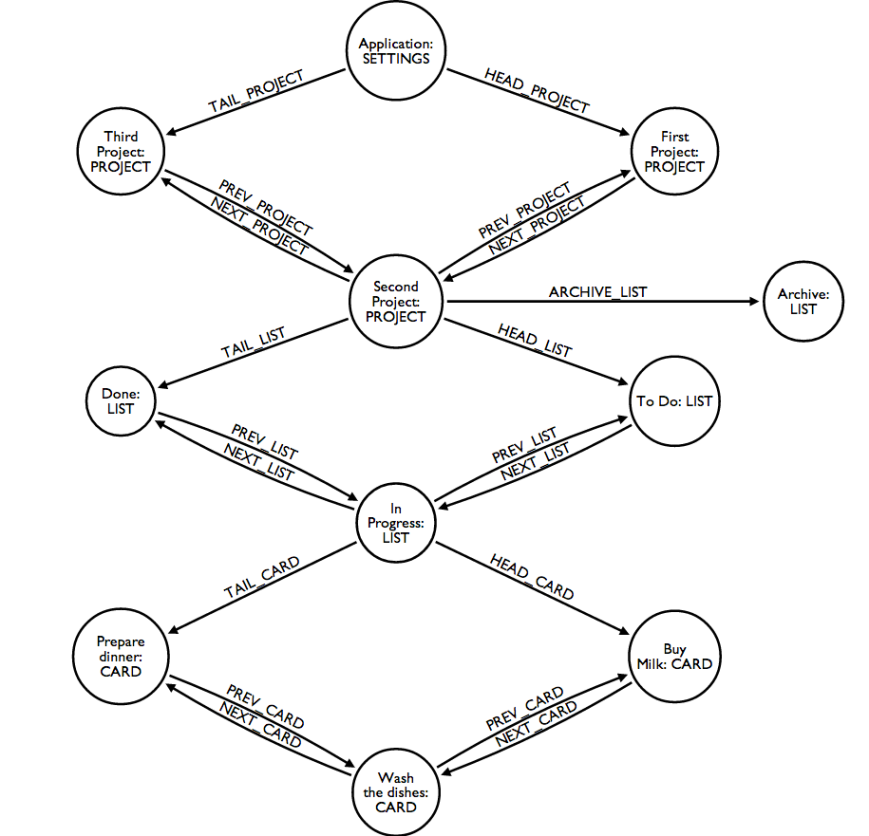
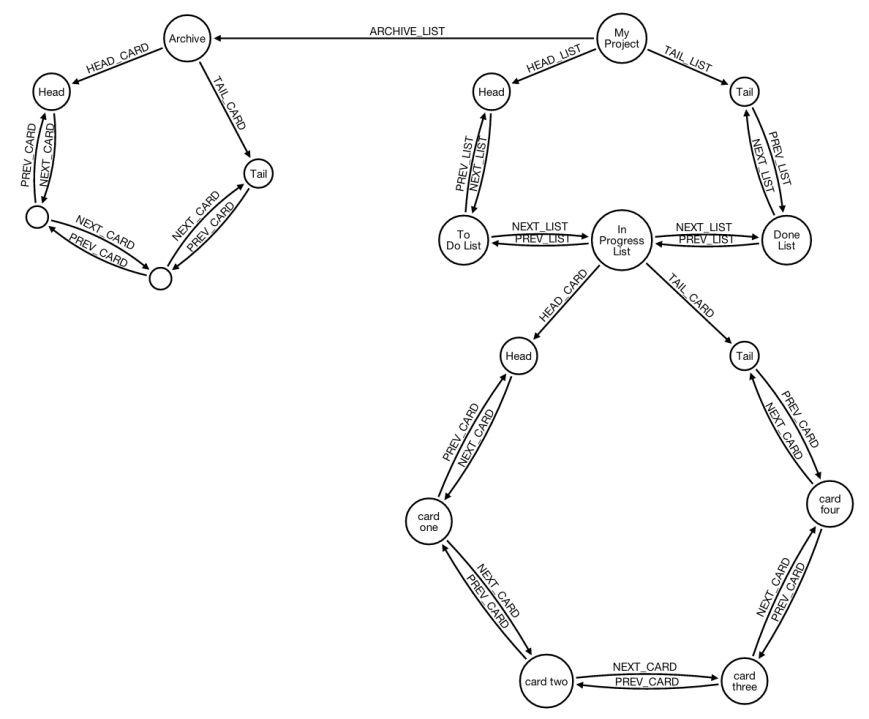
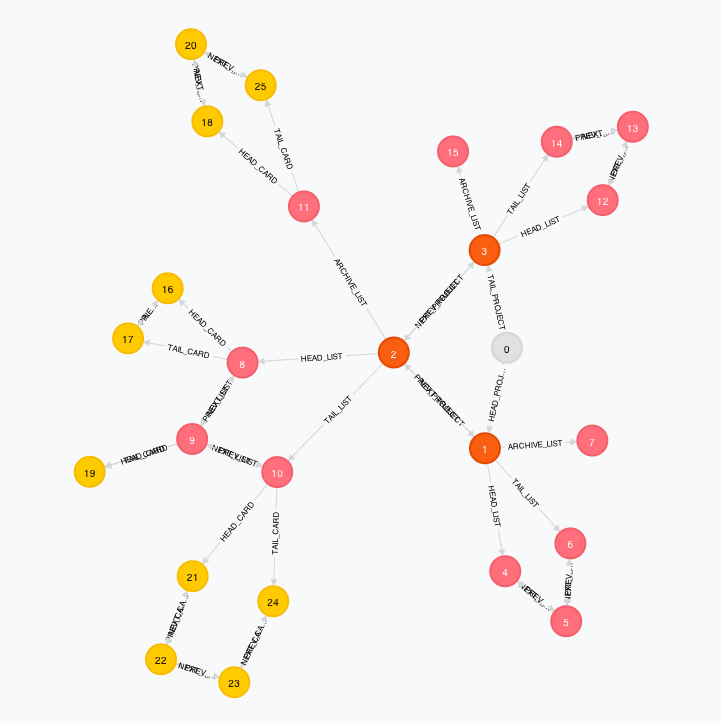
This structure is represented in the figure above as an oriented graph:

  • the Application node contains a queue of projects (in the sample graph we see represented three projects)
  • each queue is implemented with two relationships:
  • HEAD_XYZ pointing to the head node of the queue
  • TAIL_XYZ pointing to the tail node of the queue
  • all nodes in the queue are linked together by two types of relationships:
  • NEXT_XYZ pointing from the HEAD to the TAIL
  • PREV_XYZ pointing from the TAIL to the HEAD
  • each Project node contains a queue of lists (in the graph above, only “Second Project” has a queue of lists attached, with three lists, namely “To Do“, “In Progress” and “Done“)
  • each Project node also has an Archive list, connected with the ARCHIVE_LIST relationship, which is used to store archived cards
  • each List node contains a queue of cards (in the graph above, only the “In Progress” list has cards, three cards)

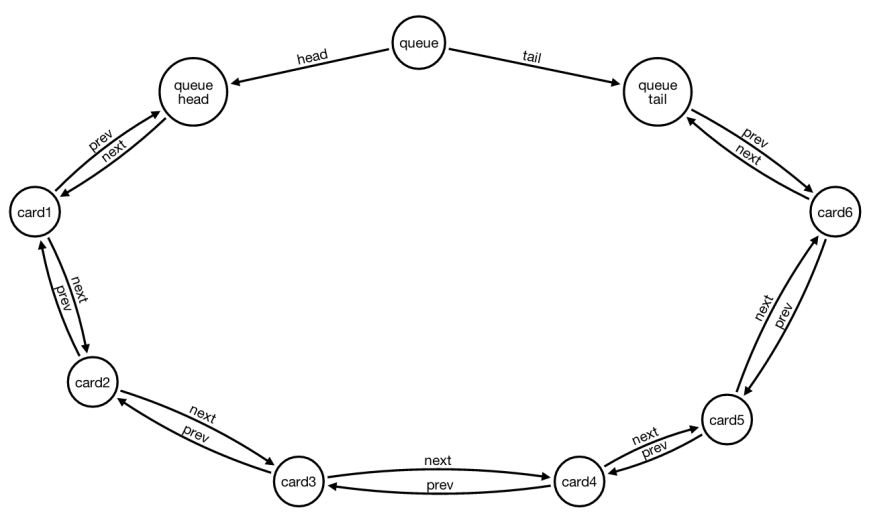
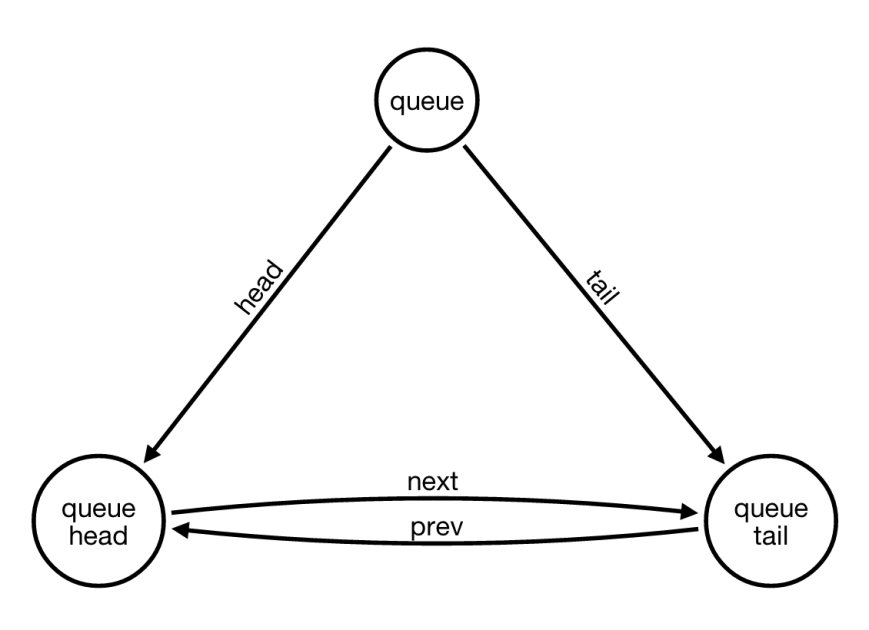
To represent an empty queue, for example when a List contains no cards, I adopted the convention where both the HEAD_CARD and the TAIL_CARD relationships point back to the list node itself.

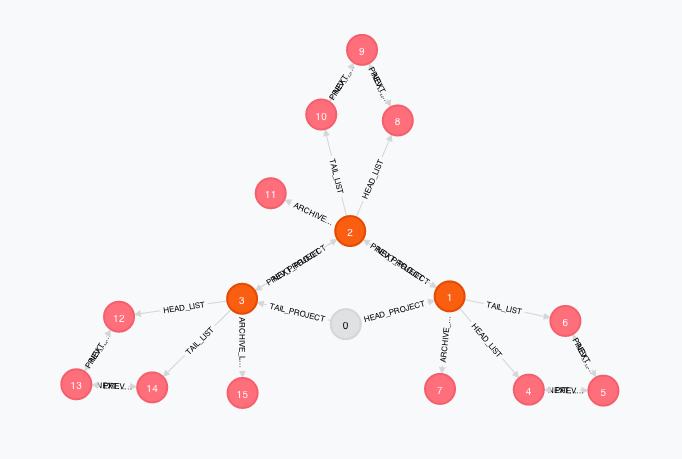
Let’s see what all this looks like when implemented in Neo4J. The following figure is a screenshot taken directly from the awesome Neo4J broswer. In this screenshot we can see a very basic structure, with 3 distinct projects, each with 3 lists and an archive list as well. No cards are present in this diagram.

Basic Graph

For reference, this is the cypher query that generates exactly the sample graph show above:

CREATE (mainApp:CollaborativeMinds { name: “Collaborative Minds” }),
(proj1:Project { name: “My First Project”, company: “ABC Inc.” }),
(proj2:Project { name: “My Second Project”, company: “ACME” }),
(proj3:Project { name: “My Third Project”, company: “XYZ Corp.” }),
(mainApp)-[:HEAD_PROJECT]->(proj1), (mainApp)-[:TAIL_PROJECT]->(proj3),
(proj1)-[:NEXT_PROJECT]->(proj2), (proj2)-[:NEXT_PROJECT]->(proj3), (proj3)-[:PREV_PROJECT]->(proj2), (proj2)-[:PREV_PROJECT]->(proj1),
(proj1ToDoList:List { name: “To Do” }), (proj1InProgressList:List { name: “In Progress” }), (proj1DoneList:List { name: “Done” }), (proj1ArchiveList:List { name: “Archive” }),
(proj1)-[:ARCHIVE_LIST]->(proj1ArchiveList), (proj1)-[:HEAD_LIST]->(proj1ToDoList), (proj1)-[:TAIL_LIST]->(proj1DoneList),
(proj1ToDoList)-[:NEXT_LIST]->(proj1InProgressList), (proj1InProgressList)-[:NEXT_LIST]->(proj1DoneList), (proj1DoneList)-[:PREV_LIST]->(proj1InProgressList), (proj1InProgressList)-[:PREV_LIST]->(proj1ToDoList),
(proj1ArchiveList)-[:HEAD_CARD]->(proj1ArchiveList), (proj1ArchiveList)-[:TAIL_CARD]->(proj1ArchiveList),
(proj1ToDoList)-[:HEAD_CARD]->(proj1ToDoList), (proj1ToDoList)-[:TAIL_CARD]->(proj1ToDoList),
(proj1InProgressList)-[:HEAD_CARD]->(proj1InProgressList), (proj1InProgressList)-[:TAIL_CARD]->(proj1InProgressList),
(proj1DoneList)-[:HEAD_CARD]->(proj1DoneList), (proj1DoneList)-[:TAIL_CARD]->(proj1DoneList),
(proj2ToDoList:List { name: “To Do” }), (proj2InProgressList:List { name: “In Progress” }), (proj2DoneList:List { name: “Done” }), (proj2ArchiveList:List { name: “Archive” }),
(proj2)-[:ARCHIVE_LIST]->(proj2ArchiveList), (proj2)-[:HEAD_LIST]->(proj2ToDoList), (proj2)-[:TAIL_LIST]->(proj2DoneList),
(proj2ToDoList)-[:NEXT_LIST]->(proj2InProgressList), (proj2InProgressList)-[:NEXT_LIST]->(proj2DoneList), (proj2DoneList)-[:PREV_LIST]->(proj2InProgressList), (proj2InProgressList)-[:PREV_LIST]->(proj2ToDoList),
(proj2ArchiveList)-[:HEAD_CARD]->(proj2ArchiveList), (proj2ArchiveList)-[:TAIL_CARD]->(proj2ArchiveList),
(proj2ToDoList)-[:HEAD_CARD]->(proj2ToDoList), (proj2ToDoList)-[:TAIL_CARD]->(proj2ToDoList),
(proj2InProgressList)-[:HEAD_CARD]->(proj2InProgressList), (proj2InProgressList)-[:TAIL_CARD]->(proj2InProgressList),
(proj2DoneList)-[:HEAD_CARD]->(proj2DoneList), (proj2DoneList)-[:TAIL_CARD]->(proj2DoneList),
(proj3ToDoList:List { name: “To Do” }), (proj3InProgressList:List { name: “In Progress” }), (proj3DoneList:List { name: “Done” }), (proj3ArchiveList:List { name: “Archive” }),
(proj3)-[:ARCHIVE_LIST]->(proj3ArchiveList), (proj3)-[:HEAD_LIST]->(proj3ToDoList), (proj3)-[:TAIL_LIST]->(proj3DoneList),
(proj3ToDoList)-[:NEXT_LIST]->(proj3InProgressList), (proj3InProgressList)-[:NEXT_LIST]->(proj3DoneList), (proj3DoneList)-[:PREV_LIST]->(proj3InProgressList), (proj3InProgressList)-[:PREV_LIST]->(proj3ToDoList),
(proj3ArchiveList)-[:HEAD_CARD]->(proj3ArchiveList), (proj3ArchiveList)-[:TAIL_CARD]->(proj3ArchiveList),
(proj3ToDoList)-[:HEAD_CARD]->(proj3ToDoList), (proj3ToDoList)-[:TAIL_CARD]->(proj3ToDoList),
(proj3InProgressList)-[:HEAD_CARD]->(proj3InProgressList), (proj3InProgressList)-[:TAIL_CARD]->(proj3InProgressList),
(proj3DoneList)-[:HEAD_CARD]->(proj3DoneList), (proj3DoneList)-[:TAIL_CARD]->(proj3DoneList)

In the next figure, I have added a few cards to each of the lists of the second project. I have archived a few cards as well, to show what the archive looks like:

Basic Graph

Once settled for the above data structure, I immediately started working on building the two main queries I needed to be able to insert new cards and to archive existing ones.

Inserting a New Card

Being these queues, all cards need to be inserted at the end of the queue, in other words at the tail of the queue, keeping in mind that an empty queue is represented by both the head and the tail relationships pointing back to the empty list node.
This means that we have two cases:

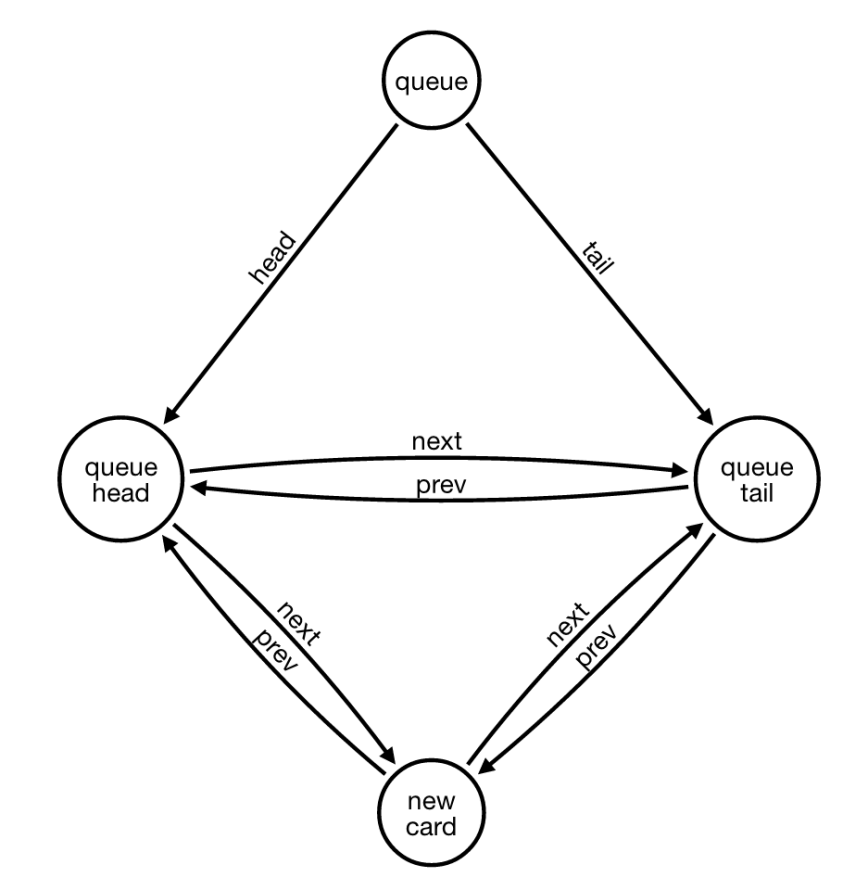
  • when the list is initially empty, inserting the first card means changing the HEAD_CARD and the TAIL_CARD relationships to be both pointing at the first card
  • when the list has already at least one card, in other words when the list already has a tail, we need to change the TAIL_CARD relationship to point to the new card, and then build:
  • a PREV_CARD relationship going from the new card to the previous tail
  • a NEXT_CARD relationship going from the previous tail to the new card

Using the power of the OPTIONAL MATCH, I translated this idea in the following query:

// first get a hold of the list to which we want to add the new card
MATCH (theList:List) WHERE ID(theList)=5
// check if the list already has at least one card
OPTIONAL MATCH (theList)-[tlct:TAIL_CARD]->(currentTail:Card)
// check if the list is empty
OPTIONAL MATCH (theList)-[tltl1:TAIL_CARD]->(theList)-[tltl2:HEAD_CARD]->(theList)
WITH
theList,
CASE WHEN currentTail IS NULL THEN [] ELSE [(currentTail)] END AS currentTails,
currentTail, tlct,
CASE WHEN tltl1 IS NULL THEN [] ELSE [(theList)] END AS emptyLists,
tltl1, tltl2
// create the new card
CREATE (newCard:Card { title: “Card Title”, description: “” })
// handle the case in which the list already had at least one card
FOREACH (value IN currentTails |
CREATE (theList)-[:TAIL_CARD]->(newCard)
CREATE (newCard)-[:PREV_CARD]->(currentTail)
CREATE (currentTail)-[:NEXT_CARD]->(newCard)
DELETE tlct)
// handle the case in which the list was empty
FOREACH (value IN emptyLists |
CREATE (theList)-[:TAIL_CARD]->(newCard)
CREATE (theList)-[:HEAD_CARD]->(newCard)
DELETE tltl1, tltl2)
RETURN newCard

Not too bad… Although I have to admit that it took me a while to get to this query in the form you see it here, being that I am not familiar with cypher and graph databases.

Essentially, OPTIONAL MATCH statements identify which scenario are we in, either working with an empty list or with a list that has already some cards in it.

Then, each of those CASE statements generate either an empty array or an array with exactly one element. These arrays are then being used as logical switches by the FOREACH statements that drive the logic underneath each case.

Archiving a Card

Let’s take a look again at the simple graph I introduced earlier that shows a few cards loaded into three lists:

Basic Graph

Now imagine the process of taking anyone of those cards and moving it into the archive queue. It shouldn’t be too hard to see that we can have 4 different scenarios:

  1. The card to be archived is the only card in that list (see card #19 in the graph above). In this case we need to move the card and then, based on the convention we adopted, point the HEAD_CARD and TAIL_CARD relationships back to the list node.
  2. The card is in the middle of a queue (see cards #22 and #23 in the graph above). This is the simplest case. Simply move the card, delete all its relationships with the card before and after, and finally link the card before and the card after with both a NEXT_CARD and a PREV_CARD relationships.
  3. The card is at the head of a queue (such as cards #16 and #21 in the graph above). In this case we need to move the card to the archive, delete all its relationships with both the list node and the card immediately next in the queue. Finally we need to create a new HEAD_CARD relationship going from the list node to the new head of the queue.
  4. Symmetric case to #3. The card is at the tail of a queue (such as cards #17 and #24 in the graph above). In this case we need to move the card to the archive, delete all its relationships with both the list node and the card immediately previous in the queue. Finally we need to create a new TAIL_CARD relationship going from the list node to the new tail of the queue.

If you have understood well how the insertion query works, you should be able to grasp the following query as well:

// first let’s get a hold of the card we want to archive
MATCH (theCard:Card) WHERE ID(theCard)=44
// next, let’s get a hold of the correspondent archive list node, since we need to move the card in that list
OPTIONAL MATCH (theCard)<-[:NEXT_CARD|HEAD_CARD*]-(theList:List)(theArchive:List)
// let’s check if we are in the case where the card to be archived is in the middle of a list
OPTIONAL MATCH (before:Card)-[btc:NEXT_CARD]->(theCard:Card)-[tca:NEXT_CARD]->(after:Card)
OPTIONAL MATCH (next:Card)-[ntc:PREV_CARD]->(theCard:Card)-[tcp:PREV_CARD]->(previous:Card)
// let’s check if the card to be archived is the only card in the list
OPTIONAL MATCH (listOfOne:List)-[lootc:TAIL_CARD]->(theCard:Card)(theCard:Card)-[tcs:NEXT_CARD]->(second:Card)-[stc:PREV_CARD]->(theCard:Card)
// let’s check if the card to be archived is at the tail of the list
OPTIONAL MATCH (listToTail:List)-[ltttc:TAIL_CARD]->(theCard:Card)-[tcntl:PREV_CARD]->(nextToLast:Card)-[ntltc:NEXT_CARD]->(theCard:Card)
WITH
theCard, theList, theProject, theArchive,
CASE WHEN theArchive IS NULL THEN [] ELSE [(theArchive)] END AS archives,
CASE WHEN before IS NULL THEN [] ELSE [(before)] END AS befores,
before, btc, tca, after,
CASE WHEN next IS NULL THEN [] ELSE [(next)] END AS nexts,
next, ntc, tcp, previous,
CASE WHEN listOfOne IS NULL THEN [] ELSE [(listOfOne)] END AS listsOfOne,
listOfOne, lootc, tcloo,
CASE WHEN listToHead IS NULL THEN [] ELSE [(listToHead)] END AS listsToHead,
listToHead, lthtc, tcs, second, stc,
CASE WHEN listToTail IS NULL THEN [] ELSE [(listToTail)] END AS listsToTail,
listToTail, ltttc, tcntl, nextToLast, ntltc
// let’s handle the case in which the archived card was in the middle of a list
FOREACH (value IN befores |
CREATE (before)-[:NEXT_CARD]->(after)
CREATE (after)-[:PREV_CARD]->(before)
DELETE btc, tca)
FOREACH (value IN nexts | DELETE ntc, tcp)
// let’s handle the case in which the archived card was the one and only card in the list
FOREACH (value IN listsOfOne |
CREATE (listOfOne)-[:HEAD_CARD]->(listOfOne)
CREATE (listOfOne)-[:TAIL_CARD]->(listOfOne)
DELETE lootc, tcloo)
// let’s handle the case in which the archived card was at the head of the list
FOREACH (value IN listsToHead |
CREATE (listToHead)-[:HEAD_CARD]->(second)
DELETE lthtc, tcs, stc)
// let’s handle the case in which the archived card was at the tail of the list
FOREACH (value IN listsToTail |
CREATE (listToTail)-[:TAIL_CARD]->(nextToLast)
DELETE ltttc, tcntl, ntltc)
// finally, let’s move the card in the archive
// first get a hold of the archive list to which we want to add the card
WITH
theCard,
theArchive
// first get a hold of the list to which we want to add the new card
OPTIONAL MATCH (theArchive)-[tact:TAIL_CARD]->(currentTail:Card)
// check if the list is empty
OPTIONAL MATCH (theArchive)-[tata1:TAIL_CARD]->(theArchive)-[tata2:HEAD_CARD]->(theArchive)
WITH
theArchive, theCard,
CASE WHEN currentTail IS NULL THEN [] ELSE [(currentTail)] END AS currentTails,
currentTail, tact,
CASE WHEN tata1 IS NULL THEN [] ELSE [(theArchive)] END AS emptyLists,
tata1, tata2
// handle the case in which the list already had at least one card
FOREACH (value IN currentTails |
CREATE (theArchive)-[:TAIL_CARD]->(theCard)
CREATE (theCard)-[:PREV_CARD]->(currentTail)
CREATE (currentTail)-[:NEXT_CARD]->(theCard)
DELETE tact)
// handle the case in which the list was empty
FOREACH (value IN emptyLists |
CREATE (theArchive)-[:TAIL_CARD]->(theCard)
CREATE (theArchive)-[:HEAD_CARD]->(theCard)
DELETE tata1, tata2)
RETURN theCard

Nonetheless, this is a massive query. I am not sure about its performance, because I haven’t measured it, but its relative complexity is already enough to make me think that there must be a way to simplify this, possibly modifying the underlying data structure.

Furthermore, keep in mind, that it took me a long time to come up with this query. What inspired me to build this query the way I did, was a clever graph gist to play Tic Tac Toe using cypher queries posted by @SylvainRoussy. Before getting this inspiration I was stuck at running four separate queries, which is when I decided to ask for help on Stack Overflow.

A few days after posting my question, Graph Grandmaster Wes Freeman left an eye-opening comment:

You might be interested to see my skip list graph gist… it handles empty lists by having a tail and head that are never deleted, so the case is always the same (removing an internal node)

This is brilliant. Not just because it reveals a much easier way to solve the problem at hand, but because it was a real eye opener for me. When I think of data structures, in my head I visualize them the way I was used to do it in college, like in the following figure, which is taken from Wikipedia and shows a doubly-linked list:

doubly-linked list

This automatically translated in my head into the need for a graph relationship every time I saw a pointer in the data structure. Wes’ comment made me finally realize that a node is an even better translation, especially when it allows to simplify the number of scenarios when working with the data structure itself.

And so we are back to the drawing board. The results will come in the next post of this series.

Building a Single Page Application with AngularJS and Neo4J – Setup

This is a cross-post from the digitalian

Setting up the environment

In this section I will list all the steps that I had to go through to get my Mac ready for coding with the stack I picked. Hopefully this will be a useful timesaver for anyone who decided to do the same. If you found this page first, you won’t have to do any research. Just follow my footsteps and within minutes (not including the hefty download of Apple’s Xcode) you will be up and running, ready for action :)

Setting up Localhost

I still use OS X 10.7 (Lion), therefore this might not be applicable to your environment if you are using a newer version of OS X. First, I deleted the ~/Sites folder inside my personal folder, then I created a linked folder with the same name pointing to the /Library/WebServer/Documents folder using the following command from Terminal:

sudo ln -s ~/Sites /Library/WebServer/Documents

This way, when you type http://localhost in your browser window, it will point to the content of your ~/Sites folder.

Installing Developer Tools for Mac

You will need to install Developer Tools for Mac which you are installed as part of Xcode. Xcode is available for free – quite a huge download, but you’ll need it.

Installing Homebrew

In order to setup the entire stack we are going to use, you would have to install several packages manually, a very tedious work that I much rather skip. Alternatively, all you need to do is to install Homebrew, a very useful package manager for OS X. To install Homebrew, simply copy and paste the following line in your Terminal window:

ruby -e "$(curl -fsSL https://raw.github.com/Homebrew/homebrew/go/install)"

Homebrew installs packages to their own directory and then symlinks their files into /usr/local.

Installing Node.js

Once Homebrew is installed you can go ahead and install Node.js

brew install node

Easy, right? Next, let’s verify that Node.js is working properly. Inside your ~/Sites folder, create a hello-node.js file and copy the following content in it:

var http = require('http');
http.createServer(function (req, res) {
    res.writeHead(200, {'Content-Type': 'text/plain'});
    res.end('Hello Node.js\n');
}).listen(8124, "127.0.0.1");
console.log('Server running at http://127.0.0.1:8124/');

Next, run this code from the command line with:

cd ~/Sites
node hello-node.js

You should see the following message in the Terminal window:

Server running at http://127.0.0.1:8124/

Next, navigate to http://127.0.0.1:8124/ in your browser, you should see the message “Hello Node.js”.

Installing npm

npm is Node’s package manager. It is now installed automatically with Node.js so there is no need to do a separate installation.

Installing Express.js

With Node.js and npm already installed, including Express in a web application is just a matter of indicating the dependency on Express within your application package.json file.

Within your application folder (i.e. ~/Sites/HelloWorld), create a file named package.json as follows:

{
    "name": "hello-world",
    "description": "hello world test app",
    "version": "0.0.1",
    "private": true,
    "dependencies": {
        "express": "3.x"
    }
}

Now that you have your application dependencies defined, use npm to install them all:

npm install

Once npm finishes, you’ll have a localized Express 3.x dependency in the ./node_modules directory. You may verify this with

npm ls 

which will display a tree with all the application dependencies, in this case just Express and its own dependencies.

To test Express.js I suggest going through the exercise explained here in the Getting Started section, all the way at the beginning of the guide.

Installing Neo4J

Using Homebrew, to install the latest stable version of Neo4j Server, issue the following command

brew install neo4j

Once the installation has completed, you can start Neo4J from the command line with:

neo4j start

This will get a Neo4j instance running on http://localhost:7474. Simply navigate to that URL with your browser to access the database browser utility, which includes some tutorials as well:

Neo4J Broswer

Application Organization

When building a Single Page Application with AngularJS, we are going to be building essentially two pieces:

  • The client, with all the JavaScript, HTML, CSS and various asset files needed for the front-end side of the application to run on the client machine’s browser.
  • The server, with all the JavaScript files required to run the web server on top of Express/Node.js, which will serve the client application requests (GETs, POSTs, PUTs, etc.), connecting the client to the Neo4J persistence layer.

While developing, your machine will play both the client and the server roles, with:

  • the web server running locally on localhost at a specified port (traditionally at port 3000),
  • the database running locally on localhost at port 7474
  • the client application running locally on localhost at port 80

After having read many articles, blog posts and questions on Stackoverflow on how to organize all these files, let me show you the structure that I have adopted, inspired by https://github.com/angular-app/angular-app and by http://briantford.com/blog/huuuuuge-angular-apps.html.

At the top level, I subdivided the application into its two main components, client and server. I have also added a client-tests folder which I had planned to use for unit testing. Shame on me, I haven’t really used it. Maybe next time around :(

Inside the client folder I structured the application as follows (folders in bold, files in italic):

  • client
    • assets
      • images
    • scripts
      • controllers
      • directives
      • filters
      • services
      • vendor
      • app.js
    • styles
    • views
    • index.html

On the server side of the application, this is the internal folder structure (folders in bold, files in italic):

  • server
    • node_modules (created by npm)
    • routes
    • package.json
    • server.js

In the end, there is no right way to do this. Everyone has their way, some like to group files by type (all controllers together, all directives together, etc.), some like to group them by functionality. There are pro and cons to both approaches, so feel free to pick the one that makes more sense to you. You will always be able to move things around later, if you find yourself limited by your structure.

Congratulations!

You are all set, ready for action! I hope you have found this post useful. It took me a while to gather all the information I needed to get to this point. I hope that this summary will help you save some time and be able to get to the fun part sooner :)

Some Optional Goodies

If, like me, you decided to use Sublime Text (either version 2 or 3), if you haven’t done so yet, you might want to install Sublime Package Control. The installation is simple and takes just a few seconds. Go to the installation page and copy the correct script for your version of Sublime Text in the Sublime Text console.

Once that’s installed, simply open the Command Palette (cmd+shift+p),
select “Install Package” and then select “Cypher”. This will install Sublime Cypher, syntax highlighting for Neo4j’s Cypher query language in Sublime Text. You will want to name your cypher files with the .cql extension so that the syntax highlighter will recognize them.

Within Sublime Text’s Package Installer you will also be able to find the AngularJS package, which you may want to install as well.

Neo4J Newbie Tip: How to reset your database

If you are like me, especially during your learning phase of development with Neo4J, you will find yourself building some basic graphs “by hand” as starting point and then running cypher queries that will, sooner or later, mess up your graph.

At that point you have two options:

  1. manually fix the parts of the graph that were affected to go back to a good state to continue development
  2. reset your database to an initial well known state

I have done #1 and got bored pretty quickly with that. Finally I figured out the best way to do #2.

First, write a .cql script which builds the “well known state” that you want to be able to go back to. It might me just a few nodes and relationships or a much more complex structure. Whatever it is, the entire script should look a bit like the following:

START n = node(*) 
MATCH n-[r]-() 
DELETE n, r 
WITH COUNT(n) AS hack
CREATE 
(Neo:Crew { name:'Neo' }),
(Morpheus:Crew { name: 'Morpheus' }),
(Trinity:Crew { name: 'Trinity' }),
(Cypher:Crew:Matrix { name: 'Cypher' }),
(Smith:Matrix { name: 'Agent Smith' }),
(Architect:Matrix { name:'The Architect' }),
(Neo)-[:KNOWS]-&gt;(Morpheus),
(Neo)-[:LOVES]-&gt;(Trinity),
(Morpheus)-[:KNOWS]-&gt;(Trinity),
(Morpheus)-[:KNOWS]-&gt;(Cypher),
(Cypher)-[:KNOWS]-&gt;(Smith),
(Smith)-[:CODED_BY]-&gt;(Architect)

The first few lines of the script kill all nodes and relationships from the database. Next comes the long CREATE command, which rebuilds the “well known state” that needs to be recovered.

The only caveat with doing this is that the database will still be the same. This means, for example, that node IDs will keep increasing every time you re-run the above script. If you want to really reset your database, just switch to the Terminal and run the following before you run the cypher script above:

cd /usr/local/Cellar/neo4j/2.0.0/libexec/data
neo4j stop
rm -rf graph.db/
neo4j start

This will stop the database server, completely remove the data folder it relies on, and then restart the server, which will reinitialize itself and create a new data folder with the same name at the same exact location.

Note

I believe that having these “reset scripts” handy will become very useful when you find yourself working on multiple projects at the same time. Sure you could have multiple Neo4J servers running on your machine, one for every project you work on, but I feel that after a while it might become unfeasible to do so. So when you switch project development all you have to do is remove your DB data folder as shown above, and then run your project cypher reset script.

Building a Single Page Application with AngularJS and Neo4J – Introduction

This is a cross-post from the digitalian

Lucky Coincidences

A series of lucky coincidences has recently brought me to dip my toes into a JavaScript-centric programming world completely new to me, from top to bottom. Or maybe I should better say, from front to back:

Front End

  • Using AngularJS, an open-source JavaScript framework, maintained by Google, that assists with running single-page applications.

Back End

  • Using Javascript also on the server side, with ExpressJS, a web application framework built on top of Node.js
  • Using JSON (JavaScript Object Notation) to transmit data objects between the client, the server and the database
  • Using Neo4J, a fully transactional Java persistence engine that stores data structured in graphs rather than in tables.

Initially I had picked the MEAN stack, a full-stack JavaScript development environment very trendy amongst prototypers in the Angular community (where MEAN is an acronym standing for MongoDB, ExpressJS, AngularJS and Node.js).

However, after I had already built a very simple prototype of my SPA (Single Page Application) using the MEAN stack, another lucky coincidence exposed me to Neo4J and it was love at first sight. My decision was that, if I had to learn something new, I would have rather enjoyed being forced into a completely new way of thinking from a data perspective as well, and so I dropped MongoDB in favor of Neo4J from my personal stack.*

“Abandon all hope, ye who enter here.”

In Dante Alighieri’s “Divine Commedy”, when Dante passes through the gate of Hell, the gate bears an inscription which reads “Abandon all hope, ye who enter here.”

It might sound a bit too dramatic to quote that inscription here but, being used to work in a very Microsoft-centric programming environment (Windows, ASP.NET and SQL Server), diving into a Javascript-centric environment felt a lot more challenging than I could have ever imagined. I had to abandon at the entrance of this new world most of what I was used to, most of what I knew and all the tools I was already familiar with. As much as it was frightening, though, finding myself almost completely disoriented felt also refreshingly good.

In this series of posts I will try to put down in words both the mental process I went through and some of the technical challenges that I found myself facing and had to overcome while building a ficticious personal project, which consists of building a Single Page Application (SPA) recreating some/most of Trello‘s functionality.

New Tools for the Trade

Being that this is a personal project and since it doesn’t require using any Microsoft technology, I decided to work off of my MacBook Pro. This decision meant that, among other things, I had to find either a decent text editor or an IDE to write my code, as well as an easy way to version control my files.

After trying out a few different tools, I opted for Sublime Text, a very versatile cross-platform text and source code editor which I liked from the beginning.

To manage the source code I decided to grab the opportunity to try out Git, a free and open source distributed version control system designed and developed by Linus Torvalds in 2005. I downloaded it and installed it on my Mac and connected it to my empty GitHub account.

Next, I created my first repo (i.e. repository) and, in order to better understand the inner workings of Git, I decided to just use the OS X Terminal, issuing git commands directly from the command line. Needless to say, not being a command line type of person, I grew tired of that within a couple of weeks, especially because I found the add/commit/push sequence a bit too cumbersome/annoying (even with some of the shortcuts that git offers). So, recently, I have downloaded GitHub for Mac. So far so good, although it’s a bit too early to really say how I feel about it. I do enjoy the fact that with one click I am finally able to commit all my changes and sync them to my GitHub repo.

A side effect of working with GitHub was the rediscovery of the Markdown language, a minimal markup language used for all README files in GitHub. Being a plain text formatting syntax, no special editor is needed to write content using Markdown, although there are some specially-designed editors which preview markdown files with styles. For now I picked Mou a very nice markdown editor which provides instant preview side-by-side to the text being edited.

Mou Editor

Coincidentally, just a few weeks ago, finally, WordPress has announced that they are now supporting GitHub’s version of Markdown within the blog post editor! Perfect timing for me to really get addicted to this simple writing tool! Because Markdown is simple enough to learn in a few minutes, clean and elegant enough to be readable no matter your context, and it is becoming the defacto markup language of the Internet, at least among the slightly geekier types who do know markup languages :)

Perfect timing! Markdown on WordPress!

this is an image

Awesome! Just when I was getting more into the swing of things (got the image?) using Markdown, between writing .md files on GitHub and using IA Writer on my Mac, WordPress has announced that we can finally use a fancy version of Markdown (which includes also code formatting and code highlighting, just like the GitHub version) also on WordPress hosted blogs!

Now, if only iPads had a Markdown friendly keyboard!1


  1. I know, I know, some applications do use the new features provided by iOS7 and do extend the default keyboard, but really the default keyboard should be a bit more Markdown friendly and at least provide easy access to symbols like #,*,@ and tabs 

Maybe Responsive Design is not such a good idea?

responsive-web-template3

While working on a side project and researching about node.js, I stumbled upon an interesting comment, made by Kiran Prasad, head of the LinkedIn’s mobile development team.

Responsive design might work for uncomplicated, one-off websites, but for applications or networks (such as LinkedIn is), responsive design is actually bad. We’re looking at

  • the entrenched use case [for desktop users],
  • the coffee-and-couch use case [for tablet users],
  • and the two-minute use case [for mobile phone users].

You can’t take a mobile app and just scale it up to tablet or desktop. A lot of responsive design is building one site that works everywhere. This might work for some websites. But it’s a bad approach for others and especially for apps… You have to come up with a completely different design for each of the above use cases.

It made me think, and brought back to mind what a colleague was recently recommending to a client (a cabinet maker company) when they asked about building a mobile version of their website. Others might have jumped on the opportunity and would have suggested a complete website redesign to make it responsive. Instead, he brought up the use case of the user who access their site from their mobile phone. “When could that happen?” he asked. “When would a person browse a cabinet maker’s website on their mobile phone? It could happen when they are at the Home Depot, looking for cabinets and they want to make some quick comparisons. So no need to put on the mobile website any media heavy content, no need to focus on the company history, or on the cabinet maker application. Just simple info about their products, with measurements and prices.

I liked his approach, use-case based. As software engineers we often end up falling to deep into the technical trenches and forget about the end user, who in fact are the people for whom we are ultimately building our products. And working from a use case perspective, responsive design, makes really no sense, because, even though it’s a really cool concept from a technical perspective, it doesn’t necessarily address any of the needs of the end users. It seems to me that it’s just another case of “just because you can do it, it doesn’t mean you should be doing it” type of scenario.

How to use CSS to style a one page web application

This is a cross-post from the digitalian

When building regular web pages we don’t often use absolute positioning in CSS. Recently, though, while building the layout for a one page web application I have been playing around with, I wanted to divide the page in three distinct areas:

  • a fixed header DIV at the top of the page,
  • a fixed footer DIV at the bottom of the page,
  • a content DIV that would stretch between the header and the footer, using the entire space no matter how much content was placed in it.

After some research, I stumbled into a CSS feature (trick?) that allows to easily stretch a DIV vertically by explicitly setting both the top and bottom properties at the same time.
Here is the CSS:

/* The html and body elements cannot have any padding or margin. */
html,
body {
    width: 100%;
    height: 100%;
}

.container {
    width: 100%;
}

/* rows and columns */
.onepage-row, .onepage-col {
    overflow: hidden;
    position: absolute;
    border-radius: 0;
}
.onepage-row { left: 0; right: 0; }
.onepage-col { top: 0; bottom: 0; }
.onepage-scroll-x { overflow-x: auto; }
.onepage-scroll-y { overflow-y: auto; }

/* define header, content and footer areas */
#onepage-header { height: 50px; top: 0; }
#onepage-content { top: 50px; bottom: 50px; }
#onepage-footer { height: 50px; bottom: 0; }

Every onepage-row DIV stretches horizontally from the left edge to the right edge by using left:0 and top:0.

In the HTML (see below) I placed three onepage-row DIVs one on top of the other, and then I positioned them as follows:

#onepage-header { height: 50px; top: 0; } — this anchors the header at the top and sets the height of the header to 50px

#onepage-footer { height: 50px; bottom: 0; } — this anchors the footer at the bottom and sets the height of the footer to 50px

#onepage-content { top: 50px; bottom: 50px; } — this stretches the content DIV all the way from the bottom of the header to the top of the footer, even when no content is placed within it.

<body>
<div class="navbar-inverse onepage-row" id="onepage-header" role="navigation">
    <div class="container">
        <div class="navbar-header">
            <a class="navbar-brand" href="#">header</a>
        </div>
    </div>
</div>
<div id="onepage-content" class="onepage-row">
    Lorem ipsum dolor...
</div>
<div id="onepage-footer" class="onepage-row">
    <div class="container">
        <p>This is a sticky footer</p>
    </div>
</div>

This is the result:

Screen Shot 2013-11-20 at 11.23.44

I have given the content DIV a light gray background color so that it is obvious that the DIV stretches all the way from the header to the footer even though the content doesn’t fill up all the space.

Next, I wanted to divide the content DIV into two areas:

  • a right sidebar of fixed size on the right
  • a main DIV that should use the entire available space on the left

First, I inserted a DIV inside the content DIV with position set to relative. This allows me to place other DIV inside of it in absolute mode, resetting the top / bottom / left / right properties to the container, instead of the browser window.

/* new absolutely positioned rows and columns can be placed relative to this container */
.relative-to-this {
    position: relative;
    width: 100%;
    height: 100%;
}

/* define main content area and right sidebar */
#onepage-main { left: 0px; right: 400px; }
#onepage-right { width: 400px; right: 0px; }

Next, I used the same trick, this time horizontally. I added inside the relative container two onepage-col DIVs (which stretch from top to bottom of the relative container) and I positioned them as follows:

#onepage-right { width: 400px; right: 0px; } — this anchors the DIV to the right margin of the relative container and sets the width to 400px

#onepage-main { left: 0px; right: 400px; } — this stretches the main DIV from the left margin of the relative container to the left margin of the right DIV.

<div id="onepage-content" class="onepage-row onepage-scroll-x">
    <div class="relative-to-this">
        <div id="onepage-main" class="onepage-col onepage-scroll-y">
            Lorem ipsum dolor...
        </div>
        <div id="onepage-right" class="onepage-col onepage-scroll-y">
            Lorem ipsum dolor...
        </div>
    </div>
</div>

This is the result:

Screen Shot 2013-11-20 at 11.24.34

This time I also added to each DIV a onepage-scroll-y class to the two columns so that a scroll bar is automatically added when the content is longer than what can fit in the DIV.

Finally, I wanted to further subdivide the main content DIV into three columns of equal size. In order to achieve this, I first placed another relative-to-this DIV to reset again the top / bottom / left / right properties to the size of the main DIV.

/* divide the main content area in three columns of equal width */
.content-leftcol { left:0; width: 33%; }
.content-centercol { left: 33%; right: 33%; }
.content-rightcol { right:0; width: 33%; }

Next, I placed three onepage-col DIVs, which I positioned as follows:

.content-leftcol { left:0; width: 33%; } — this anchors the left column to the left margin of the relative container and sets the size of the column to 33% of the size of the relative container

.content-rightcol { right:0; width: 33%; } — this anchors the right column to the right margin of the relative container and sets the size of the column to 33% of the size of the relative container

.content-centercol { left: 33%; right: 33%; } — this anchors the center column to the left margin of the right column and to the right margin of the left column

            <div id="onepage-main" class="onepage-col onepage-scroll-y">
                <div class="relative-to-this">
                    <div class="content-leftcol onepage-col onepage-scroll-y">
                        Lorem ipsum dolor...
                    </div>
                    <div class="content-centercol onepage-col onepage-scroll-y">
                        Lorem ipsum dolor...
                    </div>
                    <div class="content-rightcol onepage-col onepage-scroll-y">
                        Lorem ipsum dolor...
                    </div>
                </div>
            </div>

This is the final result:

Screen Shot 2013-11-20 at 11.25.03

For those of you who could be interest in playing with this as well, I “fiddled” the basic concept at http://jsfiddle.net/cy4RR/

How to Set the CSS Class in a Sitecore FieldRenderer

Today I was trying to set the CSS class of a Sitecore FieldRenderer tag. I tried in different ways, using the CssClass attribute, both directly in the sc:FieldRenderer tag and from the codebehind. Didn’t work. Finally I found a post that explains that the correct way is the following:

<sc:FieldRenderer runat="server" ID="myRenderer"
    Parameters="class=myCSSClass" FieldName="My Field" />