Personalized Content and Content Management Systems

I’ve been meaning to write this post for a while. Couple of months ago, Bill Maher‘s ending monologue was about personalized content. All of us who have been working with Sitecore and other content management systems knows what this is, of course. A very big majority of the users of Sitecore are marketers, and their goal is to captivate as much of their audience as possible, part of their strategy includes tailoring the content to the reader. Sitecore offers sophisticated tools to be able to track what the user prefers and then serve up specific content that interests the reader. This is great for the reader, who gets to see more content about topics that they like.

So – Bill Maher’s premise is that personalized content is making us dumber. According to him, more and more Americans are only getting “news” from places that only reinforce what they think. This leads to unchallenged thoughts and opinions, which can hinder an expanded thinking process. You can view the entire transcript here: http://bit.ly/1hXHpzE

You can also watch the video:

I get where this is coming from. I do believe that it is necessary to get a variety of information from all different sources in order to form a solid opinion about something. But as usual, there are exceptions to rules for everything. News is supposed to be about facts. It is factual information being told back to us. This IS supposed to come from multiple sources because one party may not always have all the information. There is a certain bit of corporate responsibility that news organizations should have. Its one thing to only get news from one source, and its another thing to get news about one thing. Organizations can control the latter, but they cannot control the former.

However, I think the level of personalization comes in at a much lower level, way after one has already chosen what source they want to get their information, and so it does not affect pursuing peoples focus. And this is why it does not really matter if the content at this level is personalized. If I like landscape photography, then I do want to read about landscape photography at my favorite photography website. But the website does not have any choice about the fact that I chose THAT website to go to. Nor does it have any say about the fact that I am not reading about any other sort of art.

This specifically (I believe) does not apply to branding and product sites. The idea of these sites is to make the audience interested in their product, and they have a very specific goal in mind – conversions. The site that Bill spoke about like facebook, yahoo, etc have a much more global reach, and a much wider variety of audience. Their only goal is to have people staying on their site – a very different goal than corporate and branding websites (not to say they don’t want that, too) – in the end I think people have certain responsibility as well, to seek out information and perspectives from a variety of sources.

If you do want to personalize content, take a look at Sitecore’s Personalization Editor

An edited version of this post also appears on The Runtime Report.

Sitecore XAML application Syntax

I’ve been trying to write my own XAML application recently for a client that needed a specific context-menu click function. Sitecore documented this a while back, and although it doesn’t state how to incorporate a dialog, I was able to look into how the existing controls work in the sitecore/shell directory, and figure out how to show the dialog. What I was then missing was how to write the XML layout for the application.

I was able to get together what I needed for this specific application, but then I was curious as to what else I could do. I went through the XAML documentation, but I eventually found the Sitecore documentation that is more relevant. So, for reference, this is the link that explains all the different controls available and the functionality available:

http://sdn.sitecore.net/Articles/XML%20Sheer%20UI/My%20first%20XML%20application.aspx

So – if you want to begin from scratch, this is the place to begin. The important thing to note here is the almost all controls from the Sitecore.Web.UI.HtmlControls namespace is available, and the examples show few of the important ones.

Some other links that helped:

An edited version of this post also appears on The Runtime Report, Mickey Rahman’s Other Persona.

Adding custom messages to the publish dialog in Sitecore

Sitecore has pretty sophisticated event handling and pipeline hooks functionality built in. What this means is that almost any area of the user experience can be changed to provide a more customized user experience, tailored to the business needs of the users of the Sitecore implementation. This can be done very easily by writing your own code/class, and then wiring it up using the configuration directives. Event handlers are the easiest to implement – what you need to do is make your own class, define your own method in that class, then just add your include config file with the method/class for that event:


<configuration xmlns:patch="http://www.sitecore.net/xmlconfig/">
  <sitecore>
    <events>
      <event name="publish:end">
        <handler patch:after="handler[@type='Sitecore.Publishing.HtmlCacheClearer, Sitecore.Kernel']" type="CustomClassName, CustomAssemblyName" method="CustomMethodName" />
      </event>
    </events>
  </sitecore>
</configuration>

In your method, you get what item is being published and what language is being published from the publisher options. Note that the event triggers once for each language and target combination.


Sitecore.Publishing.Publisher p = (Sitecore.Publishing.Publisher)((Sitecore.Events.SitecoreEventArgs)args).Parameters[0];
Item itemBeingPublished = p.Options.RootItem;
Language languageBeingPublished = p.Options.Language;
Database targetDatabase = p.Options.TargetDatabase.Name

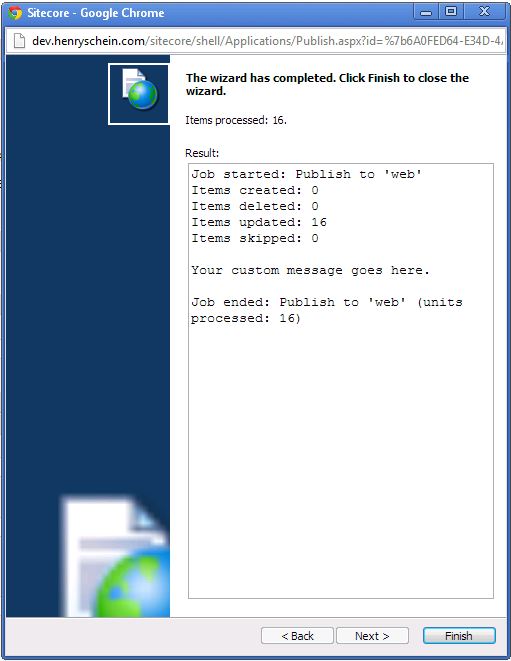
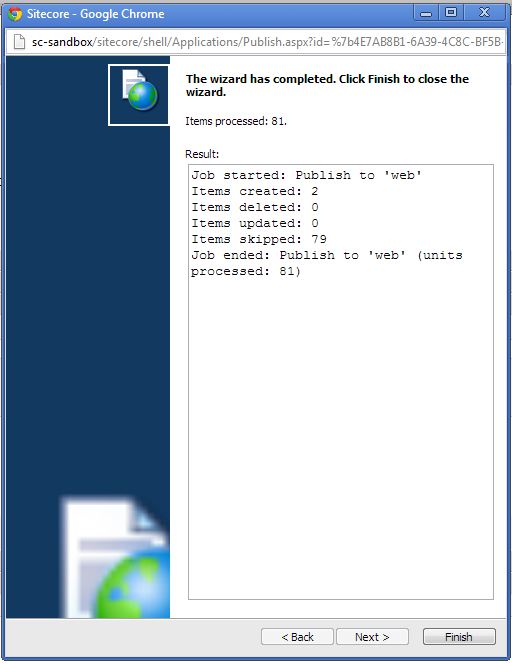
There a myriad of events available (http://sdn.sitecore.net/Articles/API/Using%20Events.aspx)- in this post, I’m concentrating on customizing the publish:end event to add messages to the dialog at the end of the publish job. The publish dialog shows informational content about what was published in the job:

The publish dialog at the end of the publish job

The publish dialog at the end of the publish job

Depending on how complex your publish:end code is, you may want to add some informational text here, to show that whatever you tried to do was successful, or not, or just output some information about what it did. Adding to this message stack is done like so:


var publishJobs = Sitecore.Jobs.JobManager
                    .GetJobs().Where(x => x.Category.Equals("publish"))
                    .ToList();

                foreach (Job j in publishJobs)
                {
                    if (j.Handle.IsLocal)
                    {
                        j.Status.Messages.Add(System.Environment.NewLine + "Your custom message goes here." + System.Environment.NewLine);
                    }

                }

You can add this at any point in your code for the event handler, and it will show in the final screen. If you are throwing exceptions in your code, however, it will show in the screen before this, where it will show the message of the exception. I usually found it cleaner to show it on the final screen, and I also don’t want to interrupt the actual publishing of the items. This is for a publish:end event, so it happens after the publish event is complete, so the actual items are already published. Depending on your scenario, you may want to kill the publishing and interrupt it, in which case an exception may work better. Once added, your message will show like this:

The publish end dialog final screen with the messages inserted as part of the publish:end event code

The publish end dialog final screen with the messages inserted as part of the publish:end event code

An edited version of this post also appears on The Runtime Report.

Sitecore Clones explained in more detail: Part 2

In Sitecore Clones explained in more detail: Part 1 – we went over a few items things about clones that could be useful in deciding how and where to use them, and their basic function. In this post, I’ll go over a specific code-related solution we had to apply to get all our business cases implemented.

Auto accept of the notifications when parent item is changed (or a new item is added under a parent item that has been cloned)

One of things mentioned in the previous post was about how clones replicate themselves, and keep themselves in sync. It is by way of notifications that are created when the clone is changed or new items added under the parent item. A content editor then has to accept the change or reject it. If accepted, the resulting change from the parent is then copied over/implemented into the clone. This is great when editors want manual control over every piece of content. However, we had a business case scenario where the clones and the parent item were not controlled by the same department. The department that manages the tree section that has the clones are allowed to add in new items, but are not allowed to change the cloned items. So whenever a parent item is changed, those changes need to propagate automatically, meaning the notifications need to be auto accepted. To solve this, we added an event handler for item:saved event, which is triggered whenever an item is changed and saved. We need to create a class, such as ForceCloneAccept.cs, and add a include config to wire it up:


<configuration xmlns:patch="http://www.sitecore.net/xmlconfig/">
  <sitecore>
    <events>
      <event name="item:saved">
        <handler patch:after="handler[@type='Sitecore.Data.Fields.ItemEventHandler, Sitecore.Kernel']" type="HenrySchein.CMS.Business.EventHandlers.ForceCloneAccept, HenrySchein.CMS.Business" method="OnItemSaved" />
      </event>
    </events>
  </sitecore>
</configuration>

The code for ForceCloneAccept.cs is as below:


using System;
using System.Linq;
using Sitecore.Data.Events;
using Sitecore.Data.Items;
using Sitecore.Events;
using Sitecore;
using Sitecore.SecurityModel;
using Sitecore.Data.Clones;
using Sitecore.Diagnostics;
using System.Collections.Generic;
using Sitecore.Links;
using Sitecore.Jobs;
using Sitecore.Data.Proxies;
using Sitecore.Workflows;
using Sitecore.Data;
using Sitecore.Configuration;
using System.Configuration;

namespace EventHandlers
{
    public class ForceCloneAccept
    {
        Database master = Factory.GetDatabase("master");

        public void OnItemSaved(object sender, EventArgs args)
        {
            using (new Sitecore.SecurityModel.SecurityDisabler())
            {
                var item = Event.ExtractParameter(args, 0) as Item;

                if (item != null && !item.HasClones)
                {
                    if (item.Parent == null || !item.Parent.HasClones) return;

                    var jobOptions = new JobOptions("AcceptChanges", string.Empty, Context.GetSiteName(), this, "AcceptChanges", new object[] { item.Parent });
                    var job = new Job(jobOptions);
                    jobOptions.InitialDelay = new TimeSpan(0, 0, 0, 1, 0);
                    JobManager.Start(job);
                }
                else
                {
                    var jobOptions = new JobOptions("AcceptChanges", string.Empty, Context.GetSiteName(), this, "AcceptChanges", new object[] { item });
                    var job = new Job(jobOptions);
                    jobOptions.InitialDelay = new TimeSpan(0, 0, 0, 1, 0);
                    JobManager.Start(job);
                }
            }
        }

        public void AcceptChanges(Item args)
        {
            using (new SecurityDisabler())
            {
                var item = args;
                var clones = item.GetClones(true);
                foreach (var clone in clones)
                {
                    var notifications = clone.Database.NotificationProvider.GetNotifications(clone);
                    foreach (var notification in notifications)
                    {
                        //if (notification.GetType() != typeof(FieldChangedNotification))
                        //{
                            clone.Database.NotificationProvider.RemoveNotification(notification.ID);
                            notification.Accept(clone);
                        //}

                    }

                    clone.Editing.BeginEdit();
                    try
                    {
                        clone.Fields["__Workflow"].Value = args.Fields["__Workflow"].Value;
                        clone.Fields["__Workflow state"].Value = args.Fields["__Workflow state"].Value;
                    }
                    finally
                    {
                        clone.Editing.EndEdit();

                    }

                }
            }
        }

        public static List GetItemClones(Item item, bool processChildren)
        {
            var realItem = ProxyManager.GetRealItem(item, false);

            var list = Globals.LinkDatabase.GetReferrers(realItem).Where(link => !(link.SourceFieldID != FieldIDs.Source)).Select(link => link.GetSourceItem()).Where(sourceItem => sourceItem != null).ToList();

            if (processChildren)
            {
                foreach (Item item4 in realItem.Children)
                {
                    list.AddRange(GetItemClones(item4, true));
                }
            }
            return list;
        }

    }
}

If you know how event handlers work, you already know that the way it is wired up, the method that will get triggered for this event is OnItemSaved; in this method we will find the context item (the item that got saved) and check for its clones, and get all the notifications each of the clone and accept them. Few things to note about this code:

    1. Notice that instead of applying the changes right in the OnItemSaved method, we are kicking off a job with a 1 second delay. Why? Because the notifications do not get added to the clones until after the item:saved event has been completed. So if you were to check the notification for that item at the time of this code running, there would be no notifications. There are other methods that you could also hook into, such as item:added, or item:created, but one of them has been deprecated, and the other only hits the first time. item:saved is something that gets called all the time, so this is more reliable. It will also get called when a new language version is added, or when new numbered version is added.

    2. There are several different types of notification that get created, based on the changes to the parent item. The notification types can be for a field change, for a child created, for an item that moved, or a version created. In AcceptChanges method, once you get all the notifications for the cloned item, you check and auto-accept only certain notifications.

    3. Clones by default do not inherit workflow. So, workflow fields are not copied over at all, even on the notification changes. The easiest (and somewhat crude) way to do this is to manually copy the fields over, so when a publish job runs, it will publish the cloned items also.

    4. Because we are only accepting notifications, and not really concerned with the changes are, we don’t have to write code to figure out the changes are. This simplifies things, and lets Sitecore handle applying the actual changes.

Similar to how we are force accepting the notifications, you can definitely write code to do anything your specific business scenario requires.

An edited version of this post also appears on The Runtime Report.

Sitecore Clones explained in more detail: Part 1

Sitecore clones were introduced first in version 6.3, as a way to centralize content items. It is a very useful way to place your items throughout the content tree, and then have the content controlled from one central location in the content tree. This is, at least the basic usage. There are other granular way to fine-tune this usage, where each of the cloned items have more control over themselves.

I’m not going to go very far into how to use clones, what they are and how they function – it is pretty well documented in the Sitecore documentation, and various Sitecore expert blogs, such as John West’s Blog. What I will detail here are some of the complications that arise when using clones, and how I tackled them.

1. Basic Usage of clones

As stated before, the basic usage of clones is to ‘clone‘ or create a copy of an item in the content tree to another different location within the same content tree. One parent item can have multiple cloned items. What this allows you to do is control the content once, in the parent item, and all the child cloned items will also get the changes (there is more to this, in the following points).

To simply create a clone, first choose the item you want to clone (News Item for Cloning), and then go to configure tab in the ribbon, and click ‘clone

Add a clone of an item by going to Configure->Clone

Add a clone of an item by going to Configure->Clone

When you click ‘clone‘, and a popup will show with the content tree – you then have to choose where the cloned item will be created. Once you hit ‘clone‘ button in the popup, the cloned item will be created. (I chose /home/news):
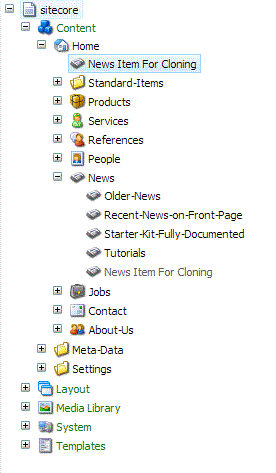
Cloned item created (shown in grey)

Cloned item created (shown in grey)

Notice that the cloned item is shown in grey. This is one way to tell whether an item is a clone.

Another way to tell if an item is a clone is to see the ‘Quick Info‘ tab – A cloned item will have a value for ‘Created From‘, which points to the original parent item.

From within code, you can check the values of item.IsClone and/or item.SourceUri

Item 'Quick Info' section

Item ‘Quick Info’ section

2. Changes to the cloned item, the parent item, and new items created under the parent.

Once a clone is created, you can still make changes to the clone. Since now there is a link between the parent item and the cloned item, it is somewhat assumed that if I change any fields in the parent item, the cloned item must change also. This is partially correct, but there are a few things that also happens:

    a. If the original value of the field and the value of the field in the cloned item is the same, it applies the changes immediately. When you click on the cloned item, you can see the change immediately.

    You can always click on a cloned item and see which values are the original value (from the parent) and which values have been changed in the cloned item itself – it will state [original value] to designate all fields that are exactly the same as the parent item.

    Cloned item field values

    Cloned item field values

    b. If the value in the field has been changed in the cloned item, and it does not match the parent item, and the value is changed in the parent item, it is not automatically applied (as of version 6.6). In this scenario when anything is changed in the parent item, and you want to see that change in the cloned item, there is an approval process. Sitecore creates a notification, which the user must accept in order to apply the change to the cloned item. For example, changing the title in the News Item For Cloning item creates a notification in the cloned item, which shows up once you click on the cloned item:

    Cloned item field change notification

    Cloned item field change notification

    At this point, you can review the original item to see the changes, accept the changes (which will overwrite the values that has been changed in the cloned item) or reject the change, which effectively keep the values that the cloned item has. If the changes are rejected, the field will not say [original value] anymore for all the fields that do not match the value in the field of the parent item. Subsequent changes to the same fields in the parent item will recreate these notifications.

    This also applies to new sub-items created under the parent item – in this case a different notification appears:

    Cloned item new item created nofication

    Cloned item new item created nofication

    As same with the other notification, the user has the ability to accept or reject the change. In this case if the change is rejected, the sub-item never appears under the cloned item. The entire tree must be re-cloned in order for the new sub-item to get cloned.

For an effective complete control of all cloned items, we have to write code to handle item:saved events for any items that have been cloned, and automatically accept the changes to all cloned items. I’m hoping in the future versions of Sitecore will give us a way to configure (when cloning) to designate whether a change must be forced or not, so there can much more granular content over each piece of item.

For examples of how to write event handlers for this, see here: http://adeneys.wordpress.com/2010/11/02/sharing-content-with-item-clones/

Note: I’ve also written code to do this: if you need some code samples, I will explain this in more detail in Part 2 very shortly. If you need the samples right away, leave a comment and I will get back to you..

3. Managing cloned items from workflow and publishing perspective

Cloned items are nothing but regular Sitecore items, with a link between the cloned item and the parent item. Once published, though, cloned item becomes real items, and the relationship between the items no longer exist. This is not an issue, because on the web database, this relationship is not needed. But remember that all changes to cloned items must be individually published, and just publishing the parent item does not publish the cloned items.

In respect to this, the cloned items can have their own workflow, even if field value changes are forced (via an event handler). So in fact, a parent item can be changed, approved and published, while the cloned items are still in a draft mode. To solve this scenario, cloned items can be made to follow the same approval process by copying the workflow properties during the event handler process which auto-accepts the notifications (more in Part 2).

4. Appearance of cloned items

As of version 6.6, the cloned items are always in grey. There is no way to configure a different style for this, other than writing custom code for it. You can add your processor to the uiCloneItems pipeline processor, and change style of the item as such:

clonedItem.Fields[Sitecore.FieldIDs.Style].Value = "color:#666666; font-style: italic";

More details about how to write the event handlers for auto-accept and their usages coming in Part 2.

An edited version of this post also appears on The Runtime Report.
Rich Text Editor style sheets in a Multi Site Sitecore solution

In the Sitecore web.config, there is a setting to point to a style sheet file, so that Rich Text Editors (RTE) all can point to a set of classes that all content editors can use. The setting is:

<setting name="WebStylesheet" value="/default.css" />

Style classes show up based on the style sheet pointed to in the web.config setting

The default setting is ‘default.css’, which comes with Sitecore – you can either add to this file, or change it to point to your own custom .css file. This all works great – unless you have a multisite solution that requires content editors to have different style sheets for each site. The setting allows you to point to only one .css file, and sometimes you may be able to get away by putting @import statements, but if you need the Rich Text Editor to be site aware while in the content editor, you’ll need to extend the control that comes with Sitecore.

In pre-Sitecore 6.4, the control that was used was Telerik RADEditor – there is an article on SDN that explains how to extend the control that if you are using versions prior to 6.4 (or 6.3).

In Sitecore 6.5, it uses a slightly different version of this control and the implementation isn’t quite the same; When ‘Show Editor’ button is clicked on the RTE control, a page pops up with the control loaded. The page that pops up is Editor.aspx, and it is located at: [your webroot]\sitecore\shell\Controls\Rich Text Editor. The first thing we need to do is to make a class to extend the Sitecore.Shell.Controls.RichTextEditor.EditorPage

using System;
using System.Collections.Generic;
using System.Linq;
using System.Text;
using Sitecore.Web;
using Sitecore.Shell.Controls.RichTextEditor;
using Sitecore.Security.Accounts;
using Sitecore.Data.Items;
using Sitecore.Configuration;
using Telerik.Web.UI;
using System.Threading;
using System.Net;
using System.Configuration;

namespace MyCustomNamespace
{
    public class RTEStyleLoader : Sitecore.Shell.Controls.RichTextEditor.EditorPage
    {
        
        protected override void OnLoad(EventArgs e)
        {
            base.OnLoad(e);

            if (!base.IsPostBack && !string.IsNullOrEmpty(WebUtil.GetQueryString("id")))
            {
                string id = WebUtil.GetQueryString("id");
                Item item = Sitecore.Context.ContentDatabase.GetItem(id);

                //This is here so that the CSS file doesn't cache
                string strNoCache = "?noCache=" + DateTime.Now.Ticks.ToString();
                
                //DO YOUR LOGIC HERE TO DETERMINE THE STYLE SHEET THAT SHOULD BE USED
                string siteCssPath = "/Styles/SiteSpecific.css"

                this.Editor.CssFiles.Add(new EditorCssFile(siteCssPath));

            }
        }

    }

}

Step-by-step Code Breakdown

1. First, make a new class in your project that inherits from Sitecore.Shell.Controls.RichTextEditor.EditorPage

public class MultiSiteEditorPage : Sitecore.Shell.Controls.RichTextEditor.EditorPage

2. Override the OnLoad method of the control

protected override void OnLoad(EventArgs e)

3. Make sure the logic in here is executed only when there is no postback and the item ID exists (when you click ‘Show Editor’, the ID of the item being edited is passed into the control)

if (!base.IsPostBack && !string.IsNullOrEmpty(WebUtil.GetQueryString("id")))

4. Get the item in context using the ID from the URL

string id = WebUtil.GetQueryString("id");
Item item = Sitecore.Context.ContentDatabase.GetItem(id);

5. Once you have your item ID and the item, determine the site in context, and then use the style sheet path to add a new css file into the RTE control. You can actually add multiple CSS files into the control – the result will be a concatenation of all the files.

//DO YOUR LOGIC HERE TO DETERMINE THE STYLE SHEET THAT SHOULD BE USED
string siteCssPath = "/Styles/SiteSpecific.css"

this.Editor.CssFiles.Add(new EditorCssFile(siteCssPath));

You can make the class in your Sitecore project or in a custom class library (although in a custom class library you may have issues trying to determine the item, etc). Once the class is complete, go to the Editor.aspx page, and change the page directive to point to your class:

change:

<%@ Page Language="C#" AutoEventWireup="true" CodeBehind="EditorPage.aspx.cs" Inherits="Sitecore.Shell.Controls.RichTextEditor.EditorPage" %>

to this:

<%@ Page Language="C#" AutoEventWireup="true" CodeBehind="RTEStyleLoader.aspx.cs" Inherits="HMyCustomNamespace.RTEStyleLoader" %>

That should be it. Now if you load the Content Editor, any items with the RTE control should show the list of classes based on the style sheet that was loaded.


Note: This is a change to components that comprise of Sitecore’s core functionality, and there are different schools of thought as to whether one should customize Sitecore to this level, as any future changes to how Sitecore implements the RTE control may break the concept shown here. Given the requirement, this is the best way I’ve found to get this done (let me know if you know a better way). Make sure all changes of this sort are documented, and it shouldn’t be an issue. You can check how future implementations are done by looking in the RTE control folder.

How to change the sc:link tag to render a specific type when using page editor

The sc:link field provided by Sitecore in conjunction with the ‘General Link’ field type is a really flexible combination. When setting a field type in a template as ‘General Link’, it gives a variety of options for links that can be inserted in that field:

Different types of link insert options

When editing an item through the content editor, clicking on each different type of link will open a different window, with the appropriate fields to enter information:

External Link Window

Internal Link Window

Media Link Window

However, there is no option to set the link type in the control when placing it in the sublayout – so users that edit the item in page editor always see the first type (which is ‘internal’) or if the item was already edited via the content editor, they will see the type of link that was set by the user when they created/updated it.

Edit Link Option when using Page Editor

I thought this was odd behavior  and researched a little bit to find that the foundation of the field was still the xsl link field – which did have a linktype. A little more research led me to find that you can set it to a certain type for the users that use page editor, by putting in the definition in the raw values option.

So, to do this, you will need to create a standard values for the template. Once you do that, go to View and check ‘Raw Values’. Once checked, go into the field in your template, and put the following text:

<link linktype="external" url="" anchor="" target="" />

Now, when you go into page editor, and you click on ‘edit link’ icon, it will open the type that you set. The different link types are:

  • internal
  • external
  • mailto
  • anchor
  • javascript

Each of these have different attributes as well – the example above shows the values for when the linktype is ‘external’, which has options for url, anchor and target.

Here are the attributes available for all the types:

<link text="" linktype="internal" url="" anchor="" querystring="" title="" class="" target="" id="[sitecore item id]" />
<link text="" linktype="media" url="" title="" class="" target="" id="[media item id]"/>
<link text="" linktype="external" url="" anchor="" title="" class="" target="" />
<link text="" linktype="anchor" url="" anchor="" title="" class="" /> 
<link text="" linktype="mailto" url="" anchor="" title="" class="" />
<link text="" linktype="javascript" url="" anchor="" title="" class="" />

This still only gives you the option in the page editor to have only one type of link. This is OK for most situations, I would imagine, and the types can always be changed in the content editor. If you know of a way to achieve this in the page editor using the command buttons, drop me a note!

Sitecore sc:editframe empty DIV workaround

The sitecore page editor has come a long way since it was first introduced. It is a very useful tool for content editors to edit pages, as opposed to the content editor, which can seem daunting to a business user. Page editor comes with a lot of options for configurations – one of these options is to have the user be able to enter a new item into sublayout, as a child of the existing item. This is acheived by adding an sc:ediframe tag in the sublayout:

 <sc:EditFrameID="editLinks"runat="server"Buttons="/sitecore/content/Applications/WebEdit/Edit Frame Buttons/MySitecoreProject">

This works great, when you already have items in there, so the <div> that contains the content has enough of an area for the mouseover to work.

When the DIV has content, it has mouseover area that can be used.

However, if you don’t have any items in there, the <div> is collapsed, so there is no area to mouseover on, and hence the context menu does not appear.

No <div> outline, so the user doesn’t know where to mouseover to see the context menu.

The very simple workaround for this is to have an instructions text, and/or an image menu icon, which hovered on opens up the sitecore page edit menu.

Simple image, and text, conditionally displayed

On the resulting .ascx sublayout, the code would be:


<sc:EditFrame ID="editLinks" runat="server" Buttons="/sitecore/content/Applications/WebEdit/Edit Frame Buttons/MyProjectName">

<asp:Panel ID="pnlInstructions" runat="server" Visible="false"><img src="/images/menu.gif" />Insert new items here by clicking on the menu button on the left.</asp:Panel>

In the code behind, you would then only display the content if in editing mode:


if (Sitecore.Context.PageMode.IsPageEditor || Sitecore.Context.PageMode.IsPageEditorEditing)
{
     pnlInstructions.Visible = true;
}

Subsequently, you can also make the instructions text come directly from the sitecore item – make a field called “Instruction”, and insert an sc:text tag into the panel:


<sc:EditFrame ID="editLinks" runat="server" Buttons="/sitecore/content/Applications/WebEdit/Edit Frame Buttons/MyProjectName"></span>

<asp:Panel ID="pnlInstructions" runat="server" Visible="false"><img src="/images/menu.gif" /><sc:Text ID="scInstruction" runat="server" Field="Instruction" /></asp:Panel>